If you want to get the most out of your binoculars, then you need to learn how to collimate them. Fresh binoculars out of the box will not need collimation. If they do, you should send them back. However, if you have owned your binoculars for a few years, and they have gone through a few bumps and scrapes, the collimation becomes important. It reduces eye strain and improves the clarity of images.
Learning how to collimate binoculars isn’t too tricky. The main issue is that each pair of binoculars works in a slightly different way. Some have collimation screws, for instance. Others don’t. What we will do is give you a general overview of how to collimate your binoculars. This should show you that the process is simple, and you only need to have a few basic tools.
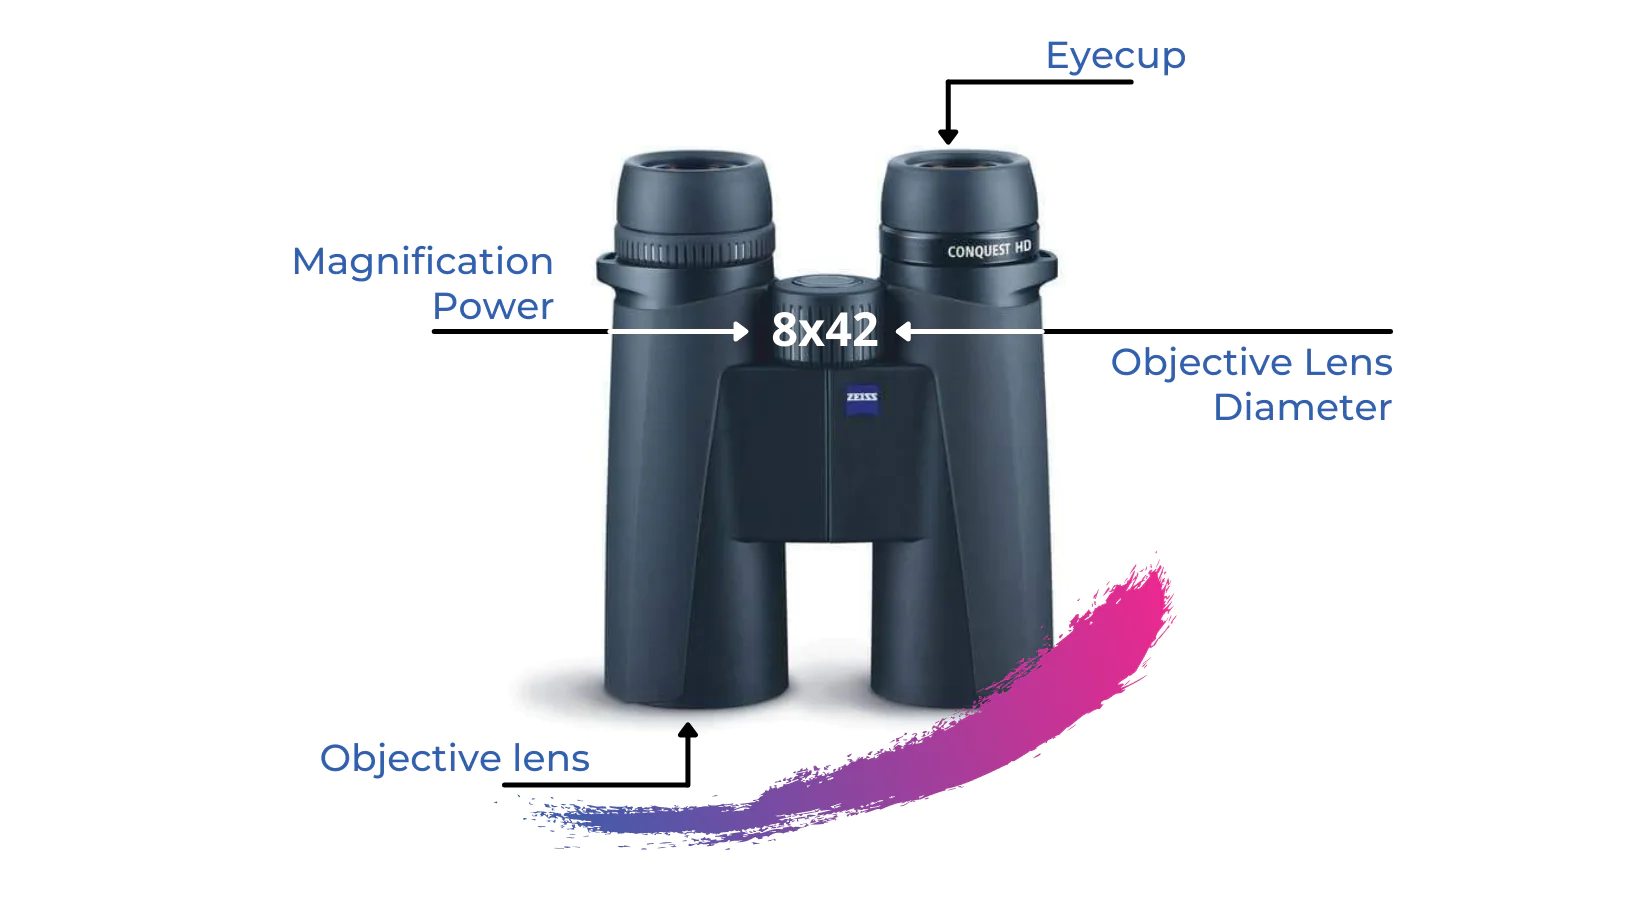
How Do You Know When You Need to Collimate Your Binoculars?
Binoculars need collimation if they have been dropped, or stored incorrectly. Both of these can cause the prisms in the binoculars to become misaligned.
Binoculars work by combining the images coming through both of the eyepieces into a single image. If the prisms have become misaligned, the image going into each eye will be slightly ‘off’. When they combine, you get blurriness, or double images created. This can cause eyestrain and serious headaches. You may not even notice that your binoculars need collimation if the prisms are only slightly misaligned. However, if you have suddenly noticed that looking through your binoculars is giving you a headache, or your eyes hurt, then you will probably need to collimate them.
Remember, collimation can only get you so far. You can do a bit of adjustment, but that’s it. It isn’t going to rectify bent tubes on your binoculars or anything. It isn’t going to fix completely dislodged prisms. It is just going to bring slightly misaligned eyepieces into alignment.
How To Collimate Your Binoculars
As we said at the start, we can only give you a general overview of how to collimate your binoculars here. This is because every set of binoculars is different. If you have a cheaper pair of binoculars, there may be very little that you can do (many of them do not have adjustment screws). If you can, we suggest you get hold of the manual for your binoculars. If you have a quality pair, then it may walk you through the collimation process for your set. At the very least, it will tell you where some of the components that we are about to discuss are located.
Remember, you should not collimate your binoculars if you don’t 100% know what you are doing, nor if you are not positive that the binoculars are out of collimation. While it is a simple process with very few steps, you are still going to be fiddling around with very sensitive parts. If you adjust too much, then you may completely break your binoculars. So, if you aren’t confident, take your binoculars to a qualified repair agent.
Note: we will only be walking you through external collimation here. Internal collimation involves physically opening up the binoculars and adjusting the prisms. This is out of the scope of this guide. It is tricky to do, and nobody should be doing internal collimation after reading an article online. You need to be qualified, or you run the risk of ruining the binoculars.
You will need:
- A set of precision screwdrivers
- A binocular mount (if possible. It makes the process easier).
Also Read: Best Cleaning Kits for Binoculars
When To Collimate Your Binoculars
We suggest that you collimate your binoculars at night. Collimation is much, much easier to see when you are focusing on stars in the sky. Most people don’t even notice light collimation during the day. They just get headaches and eyestrain for no reason.
As we said, try to mount your binoculars, if possible. It leaves your hands free to make any adjustments.
Also Read: How to clean Binoculars?
Step One: Focusing on a Singular Point
Start by focusing your binoculars on a single object. Ideally, a star. If you are doing this during the daytime, then whatever you are focusing on should be stationary, relatively big, and at least half a mile away.
Step Two: Defocus One Eyepiece
Look through one eyepiece. It doesn’t matter which. You will be doing this to both of them, eventually. You will want to adjust the diopter for that eyepiece until the object that you are staring at is completely blurred.
Step Three: Adjusting Interpupillary Distance
Adjust the interpupillary distance on your binoculars to a comfortable level. This part isn’t too tricky.
Step Four: Focus The Other Eyepiece
This is going to cause a bit of eyestrain, so be prepared.
You will need to look through both the eyepieces at the same time. You now want to focus on the other eyepiece (i.e. the one that you didn’t just defocus) until you get a clear image.
If you need to collimate your binoculars, then you will notice that as you adjust the focus on this eyepiece, the blurry image and the focused image will be distinct from one another. They won’t quite align, giving you a double image through the binoculars.
Once you have the eyepiece perfectly focused, you can start the collimation process.
Step Five: Adjusting The Collimation Screws
Look for the collimation screws on your binoculars. You will need to pull out the manual if you don’t know where they are. They will normally be behind some flap or a piece of rubber. Rarely are they exposed. There will be two collimation screws, as there are two prisms.
Once you have found the collimation screws for the focused eyepiece, you can start to collimate. This involves making small adjustments to one of the collimation screws (no more than 1/8th of a turn at a time) and seeing the impact that it has on the image.
You will want to keep adjusting these collimation screws until you find that the focused image and the unfocused image are completely lined up i.e. no double image. No blurriness. This may take a while. But, make sure that you aren’t twisting the screws too much. Make a note of the impact each turn is having on the image.
This is where things do get a bit tricky because adjusting the screws too much can cause the prisms to dislodge, and this means you will need to take your binoculars in to be repaired.
Step Six: Repeat The Process With The Defocused Eyepiece
Once you believe that you have lined up the images properly, repeat steps 2 to step 5 for the other eyepiece. You shouldn’t have to do step 3 again, though. The interpupillary distance should be fine.
If you have followed our instructions, by the end of this step, you should have been able to collimate your binoculars perfectly.
Final Thoughts
It is rare that you will need to collimate your binoculars, at least a quality pair. Most of the time, if you need to collimate, it means that you haven’t been treating your binoculars properly, or you may have dropped them. If you want to avoid having to collimate in the future, either pick up a quality set of binoculars or buy a proper, solid storage case for the ones that you own.
Remember, if you can’t collimate your binoculars using the method we detailed here, it means that your binoculars are damaged internally. If this is the case, then you will either need to get them repaired or replaced.

An optics enthusiast – I love bird watching as well as wildlife. Originally from South Africa, I moved to the UK at a young age. I love reviewing the latest binoculars as well as traveling. I work as a comms consultant during the day. My plan is to travel across the world so building up to that goal.